1. What Is MongoDB?
- MongoDB is a NoSQL database, meaning ‘not only SQL’
- SQL databases store information in tables and have a schema
- Different NoSQL databases store information in a multitude of formats and are generally less bound to schema controls
- Another big difference is that SQL databases have a standard mostly unified language that they are named for, called structured query language
2. Reasons To Use MongoDB
- MongoDB does not have a schema making development fast and quick to get started
- Changing and evolving projects is easy without a schema to migrate making it easy to change and maintain
- Syntactically simple query language (looks more like a functional programming language)
- Rapidly and widely adopted (see here)
3. Documents
- Document is the unit of storing data in a MongoDB database
- Document uses JSON format for storing data
- A simple example of a JSON document is as follows:
![]()
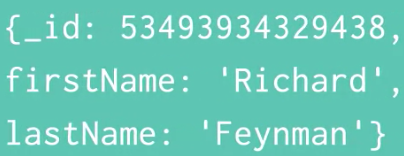
- Here we have a record of a user called Richard Feyman
- This user has a firstName and lastName field and their corresponding values are strings
- Every document also has a required _id field and that makes the document uniquely identifiable – MongoDB takes care of this field when we create new documents
- Often, the term ‘object’ refers to a document
4. Document Data Types
- The following table show the various data types which may be used in MongoDB
|
Data Types |
Description |
| string | may be an empty string or a combination of characters |
| integer | digits |
| boolean | true or false |
| double | floating point number |
| null | not zero, not empty |
| array | list of values |
| object | may be a value, variable, function or data structure |
| timestamp | 64 bit value referring to a time and unique |
| internationalized strings | UTF-8 for strings |
| object ID’s | every MongoDB object or document must have an ObjectID which is unique |
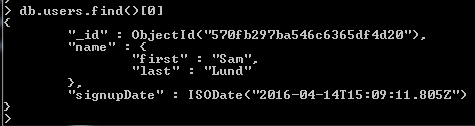
5. Document Example
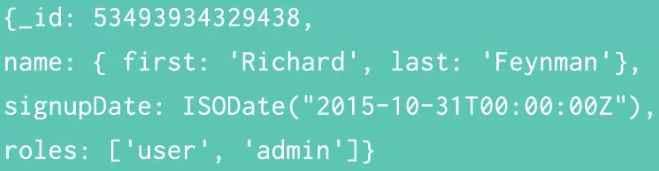
- First we can model the ‘name’ as one key with an object as its value
- The ‘first’ and ‘last’ keys are then mapped to that object
- Another piece of information we want to store is when the user signed up using the ISODate format
- Finally we can store an array of values that will represent the user’s access privileges
- As you can see, this user is given the role of ‘user’ and ‘admin’
6. Collections
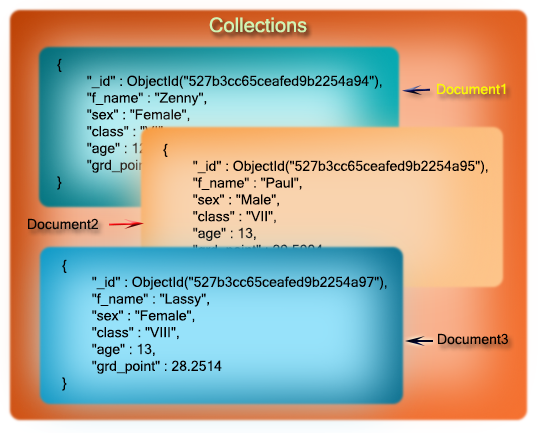
- A collection may store a number of documents
- A collection may store documents that do not have the same structure
- This is possible because MongoDB is a schema-free database
- In a relational database like MySQL, a schema defines the structure of data in a database
- Therefore in MongoDB, it is possible to store documents of varying structures in a collection
7. Collections and Documents
- The following table will help to understand the concept more easily:
| MongoDB | |
| Collection | Table |
| Document | Row |
| Key | Column |
| Value | Value |
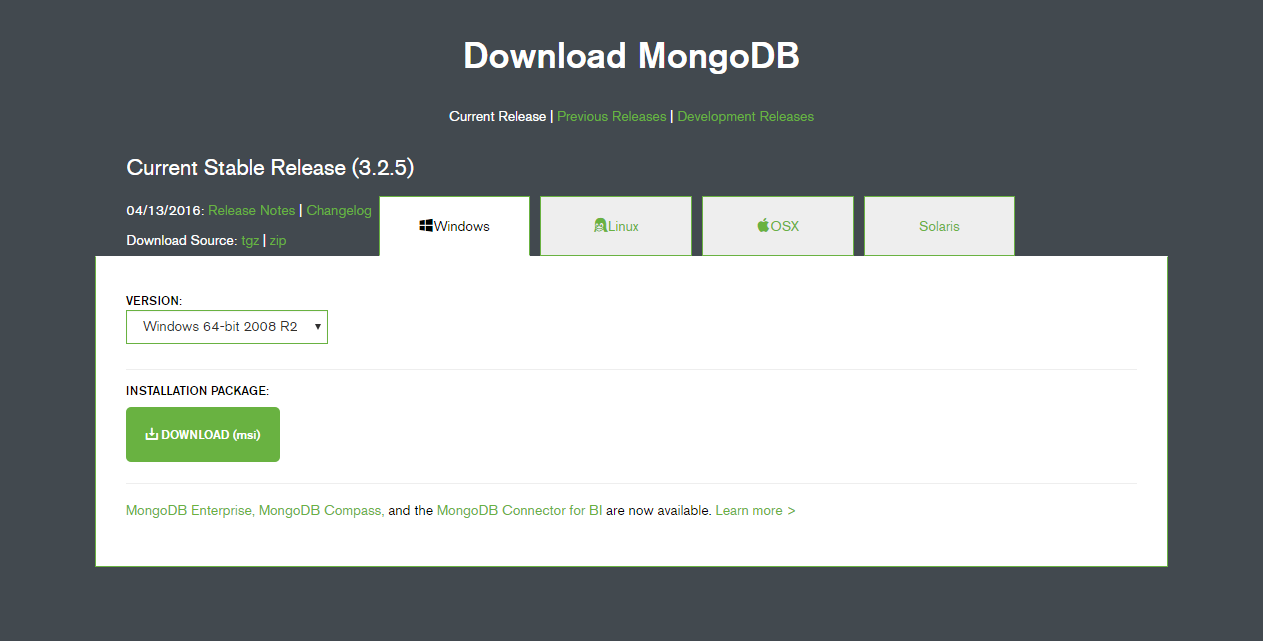
8. Setting Up MongoDB (Windows)
1. Download the MongoDB installer file from the downloads section of the MongoDB website:
![]()
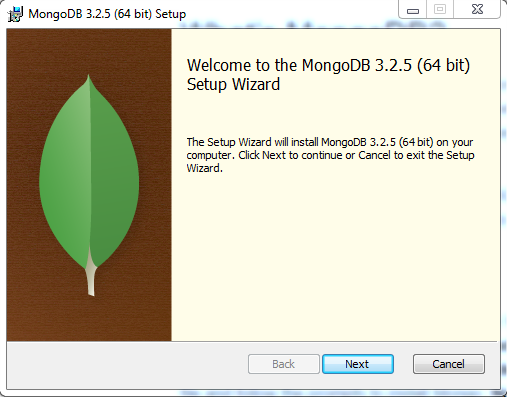
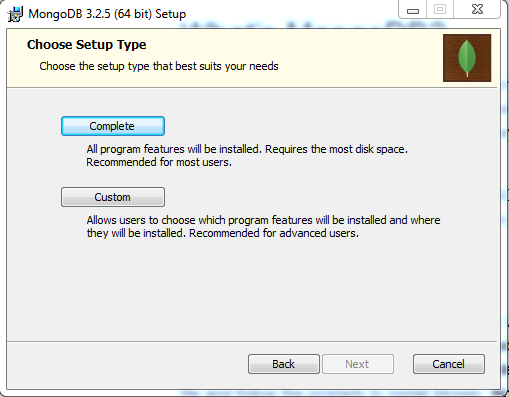
2. Double click the file and follow the prompts to install Mongo
3. Next we will click custom so we can specify a custom directory to install MongoDB (C:\mongodb)
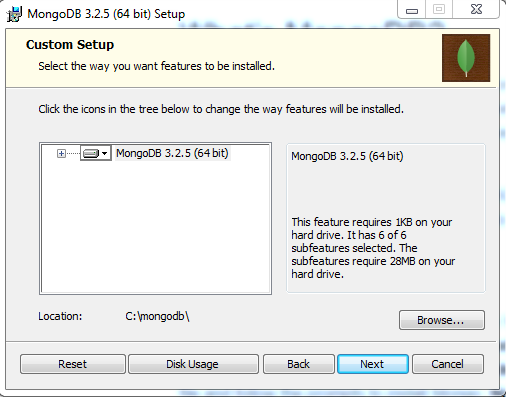
- Note: this step is not necessary however for the rest of this guide we will be referring to this directory when running the MongoDB daemon and shell
4. Now open a command prompt and create the directory (using mkdir command) where MongoDB will store its files

- I have previously created mine hence the message
5. In the command prompt we will start the MongoDB daemon by running:
![]()
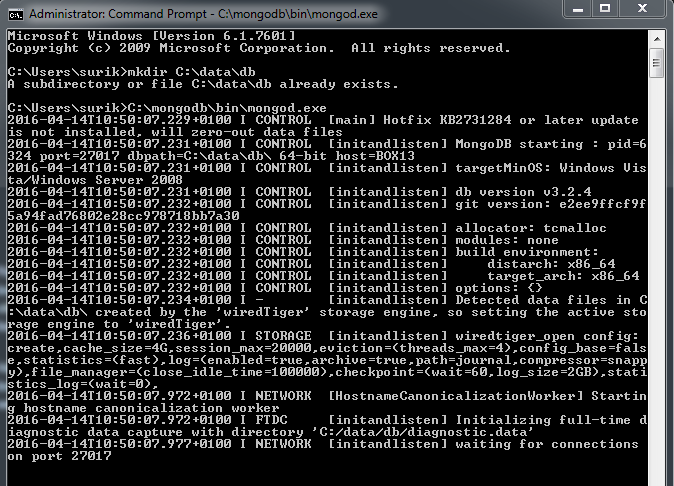
- The Mongo daemon is an application and the data itself is stored in its own directory (C:\data\db)
6. Finally, we will connect to MongoDB using the Mongo shell – while the MongoDB daemon is running, from a different command prompt window run:
![]()
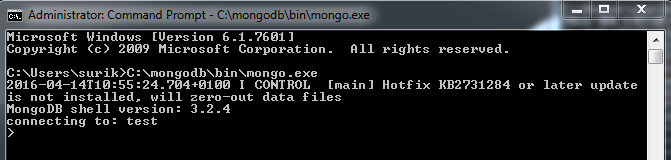
- The Mongo daemon (mongod) runs the Mongo database
- The Mongo shell (mongo) is an access point to the database where we can control it
- In this guide we will use Mongo through the shell
9. Basic Mongo Commands
List Databases
- “show dbs” will list the databases Mongo currently has
![]()
- The ‘local’ database is used by the mongod instance itself and handles some internal processes for Mongo
Create a Database
- We can create a new database with the “use” command
![]()
- We are now inside the “mongoBasics” database
![]()
- Now when we list all databases, mongoBasics will not appear because it has no data
Adding Data to the Database
- “db” represents our current local database; mongoBasics
- “post” refers to a collection – in this case the post collection will be created when we insert our first post document
- We can add a document to the post collection by passing a JSON object to the “insert” method
![]()
- Now when we “show dbs”, we now see the mongoBasics database
![]()
Viewing All Collections
- We can view all of the collections in our database using “show collections”
![]()
Accessing Collections
- We can use the “find” command to list all the documents in the post collection
![]()
- This displays the one document we have created
Delete a Database
- We can delete our mongoBasics database by using the “dropDatabase()” command
![]()
10. Realistic Data Model in Mongo
- We will be playing with data for a blog website
- Remember: documents are individual records which can be organised into collections
- In our application, we will have a “users” collection and a “posts” collection

- Our user collection will store information about our authors:
- name
- signupDate
- The posts collection will organise content about our blog posts – each blog post will store:
- title
- description
- body
- author
- The author field is special as this will store a reference to a user from the “user” collection
11. Storing Data in Mongo
Download the Database
- We will now load our blog data model into Mongo
- Download the seed.js file by forking this repo
- Or clone it directly by running:
![]()
- I have saved it to this directory: C:\Users\surik\Documents\projects\treehouse-mongo-basics
Load the Database in Mongo
- We will load the seed.js file with a relative path to where we run the MongoDB shell
![]()
Explore the Database
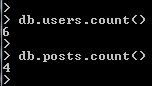
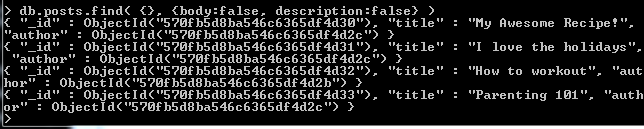
- The seed.js file creates six users and four blog posts
- We can see this by running:
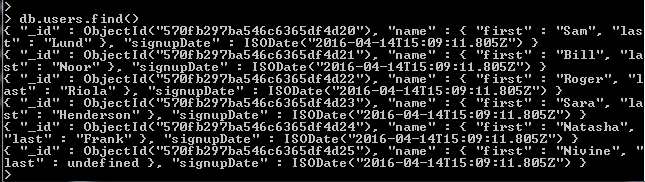
- We can see all the users by using the “find()” method without any parameters on the users collection:
- If we wanted to find individual users we can query the collection like an array:
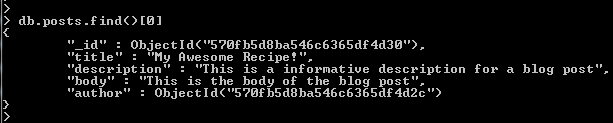
- We can access our posts in the same way:
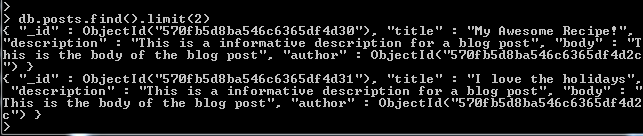
- If we had a large dataset, we could use the “limit()” method to limit the number of documents returned e.g. 2 documents:
12. Assigning Variables
- Let’s assign one of our posts to a variable called “post”:
![]()
- We can access any of the properties on the post document with the dot notation:

- The post document has a special field which is the “author” field:

- The “author” field is called a reference field because it references documents in another collection
- In this case the reference is to documents in the “users” collection
- Let’s assign the author’s ID to a variable called “id”:

- Now we can use the variable “id” to lookup the associated author in the “users” collection

13. Managing Collections
Viewing Collections
- We can see the collections in our database with the “getCollectionNames()” method:
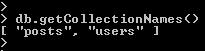
- This is useful when you are given a database and need to start exploring it
Indexes
- Another useful collection level operation is ability to see indexes on a collection using the “getIndexes()” method
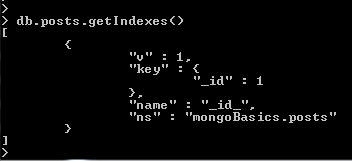
- We can see there is only one index and it is on the “_id” key which is named “_id_”
- This is an index automatically created by Mongo to facilitate quick look ups by a documents id.
- In our use case, a logical index would be on post title since we may decide to look up posts by their title
- In order to create this index, we’ll use the “createIndex()” method
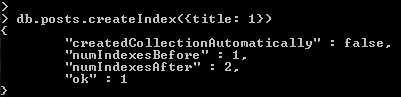
- We provide the method an object which takes a key (which is the property of the documents that we will index) which is in this case “title” and this takes a value of “1” to index the documents by title in ascending order (or a value of “-1” to index the documents by title in descending order)
- “createIndex()” method can take a second parameter which is a set of options (we won’t provide any for now)
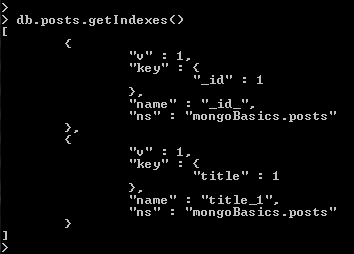
- Now when we use the “getIndexes()” method
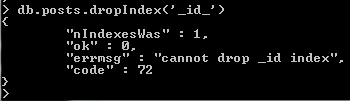
- We can delete indexes using the “dropIndex()” method
![]()
- Mongo protects the “_id” key from being deleted
Querying Collections
- How you query data will determine how you choose to model and store it
- Until now we have been using the “find()” method to query a collection
- The “findOne()” method returns only one document from the collection

- Both the “find()” and “fineOne()” methods can be used with query parameters
- Methods can take two query parameters
![]()
- The second parameter is called projections; projections are an object where the keys are fields to return and the values are booleans of whether they should be returned
- This returns all posts without the associated description and body data
- We can also do the inverse with projections

- We can query the title field, by supplying the title field as a key in the query object, along with some projections to reduce which information we want to see
![]()
- Keep in mind Mongo is looking for exact matches
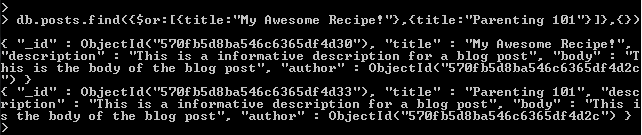
- Now let’s change our query to return a post which has the title “My Awesome Recipe!” OR “Parenting 101” – we’ll use a query operator “$or” to accomplish this
- We provide “$or” with an array of two objects
14. Updating Data
Task
- Update a post with a particular author
Step 1
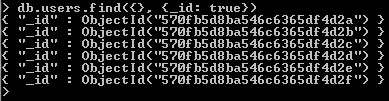
- First, let’s find the ID’s for the authors
- We’ll use a projection to only return “_id”
Step 2
- Copy the second “ObjectId” in the list
Step 3
- Now we can find the post where the author is equal to that ObjectId

Step 4
- Now using the same query but with the “update()” method, we can now update fields on that post
- The first parameter of the “update()” method is a query object
- The second parameter of the “update()” method is going to be the update parameter which takes an update operator- in this case we are using “$set” (see update operators)
- With the “$set” operator we can update one or more fields
- In this case we’ll create a new field called “tags” with a value of an array containing topic tags and we’ll change the title field

Step 5
- Let take a look at this document again to see our changes

- We can see that the tags field was added and the title field has been changed
- You are now able to create, read and update data in Mongo!
15. Advanced Queries
Chaining Methods
- We can use the “limit()” method to return a limited number of documents
- We can chain the “limit()” method to end of a “find()” query

Exploring Keys in a Collection
- It is useful to see what fields we are working within a given collection
- To see the keys for the first document we can use the “Object.keys()” method

- Keep in mind this is a loose method when working with Mongo as documents in a collection can have some fields but not others
- You can use a more advanced query (see here) to find all the keys in a collection
Sorting in Alphabetical Order
- We can return the posts documents in alphabetical order with the “sort()” method
- The sort() method takes an object where the key is field you want to sort by (title) and the value is whether we’d like to sort in ascending (1) or descending (-1) order

Pagination Example
- Pagination means that you display a set of results across different pages e.g. different pages on a blog will display 5 blog posts per page in new-to-old order
- We can use the “skip()” method chained to the “limit()” method
- Let’s say we want to display a maximum of two results for each page
- On the first page:

- On the second page:

- We can combine this with the “sort()” method to display the results in alphabetical order

16. Language Drivers
- Language drivers allow you to work with a given technology directly in a language of your application
- So far we have used Mongo in a command line shell
- Here is a list of Mongos drivers
17. Sharding
- As the database grows we will eventually have to store data across multiple servers
- This process is called sharding or horizontally scaling
- Besides the size of the data, another advantage of scaling your database across multiple servers is so that multiple databases can handle requests to read and write data
- This is where MongoDB has a big advantage over SQL databases
- MongoDB can spread read operations and write operations across many machines as it needs to
- This is because Mongo can store portions of the dataset across as many different instances as it wants
- Relational databases can store data on as many databases as they want however each database contains an entire copy of the dataset
I have looked all over the internet and your tutorial was the only one to help me truly understand MongoDB as I am a super dummy taking coding classes! God Bless you Kulsuri!
Hi Rizzy,
Thanks for the kind words, I’m glad it helped!
Kind regards,
Kulraj